Splitting STEM Tracks for Free
Understanding Stem Tracks
Stem tracks are individual audio components extracted from a full mix, typically separating vocals, drums, bass, and other instruments into isolated tracks. Unlike raw multitrack recordings, which contain each instrument recorded separately before mixing, stem tracks are derived from a finished mix, allowing users to manipulate specific elements without access to the original project files. This technique is widely used in music production, remixing, and audio restoration.
Why Split Stem Tracks?
Separating stem tracks from an MP3 file opens up a variety of creative and practical applications. Musicians can extract specific instruments, such as guitar or piano, to use as backing tracks for practice or performance. Karaoke enthusiasts benefit from vocal removal to create high-quality instrumental versions of songs. DJs and producers can isolate drums, basslines, or vocals to remix or mash up tracks. Additionally, educators and researchers use stem separation for music analysis and transcription.
Commercial Tools for Stem Separation
Several commercial tools leverage advanced AI and machine learning algorithms to separate stem tracks with impressive accuracy. Software like iZotope RX, Moises, and Spleeter by Deezer offer high-quality separation, often distinguishing multiple elements such as vocals, drums, bass, and other instruments. Many of these tools provide cloud-based processing, making them accessible even for users with limited computing power. However, most premium solutions require a subscription or purchase, which can be a barrier for casual users.
Audacity
Audacity, a popular open-source audio editor, provides a free way to separate stem tracks, though its methods used to be more manual compared to AI-driven tools. Users can employ built-in effects like "Vocal Reduction and Isolation" to remove or extract vocals, as well as phase inversion and equalization techniques to isolate certain frequencies. While the results may not match the precision of commercial solutions, Audacity remains a valuable tool for DIY stem separation, especially for users who prefer free and offline software.
A Hero to the Rescue: OpenVINO
OpenVINO (Open Visual Inference and Neural Network Optimization) is an open-source toolkit developed by Intel that accelerates deep learning inference on various hardware platforms. When it comes to stem separation, OpenVINO can significantly enhance performance by optimizing AI models for efficient execution on CPUs, GPUs, and even edge devices. By leveraging its deep learning capabilities, users can process audio separation tasks faster and more efficiently without relying on cloud-based solutions. This makes OpenVINO a powerful ally for those looking to integrate high-speed, AI-driven stem extraction into their workflow while maintaining control over their hardware resources. OpenVINO is particularly beneficial for users with limited internet access or those who prefer to keep their audio data local. By utilizing OpenVINO, users can harness the power of AI for stem separation without the need for expensive commercial software or cloud services. This opens up new possibilities for musicians, producers, and audio engineers to explore creative avenues in their projects while maintaining control over their data and resources.
Installation
It has an Audacity plugin that can be downloaded from from the official plugins page. To install, we follow the instructions on the page:
- Download and run the installer. Now, the installer comes with a lot of pretrained AI models. If you want to install everything, it will take a whopping 25 GB of space. However, most of the models are for specific and niche use cases, such as speech to text, music generation, and so on. We only need the Music Separation Models. The noise suppression model is also useful, but it will usually be unnecessary as contemporary music is already almost noise-free. The installer will ask you to select the models you want to install. You can select the Music Separation Models and Noise Suppression Model. The installer will download the models and install them in the directory you selected. The default directory should be correct; under the Audacity installation folder.
- Next, we need to enable the OpenVINO plugin in Audacity. The last window of the installer shows this as well. So we open Audacity, go to Edit > Preferences > Modules, scroll down to mod-openvino, and set it to enabled.
- Finally we restart Audacity.
Usage
First, we open the audio file that we will split. Remember that the original quality of the audio file is important; if the audio file is of low quality, the separated tracks won't be of high quality either:

Then we select the complete track with Ctrl+A and go to Effect > OpenVINO AI Effects > OpenVINO Music Separation. This will open a new window where we can select the type of separation we want. We can select the type of separation we want from the drop-down menu. The options are pretty basic; either 2 sten as instrumental + vocals or 4 stem as drums + bass + other + vocals. The 2 stem option is the most basic one, and it will separate the vocals from the rest of the track. The 4 stem option is more advanced, and it will separate the drums, bass, other instruments, and vocals into separate tracks. Note that it cannot isolate individual instruments; anything other than bass and drums would end up under other track. If you have synth and guitar at the same time, it won't be able to separate them. This is one of the limitations; commercial tools claim they can separate individual instuments, but I have not verified this.
You can keep the inference device as CPU, any GPU will not be enabled by default and the time gains will not be significant to justify the hassle of setting it up. There is also no significant option under advanced, so you can leave it as is.
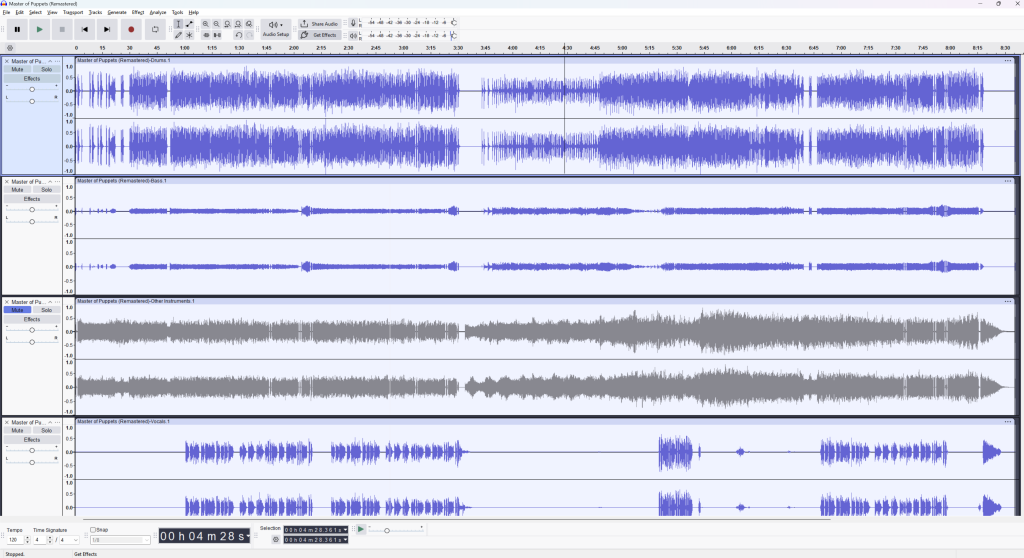
After clicking OK, it will take around 2 minutes to process a 8:30 minute long track on a 13700F CPU. Once completed, it will create 4 new tracks under the original track: Drums.1, Bass.1, Other Instruments.1, and Vocals.1. The numbers are the version numbers; if you run the effect again, it will create a new track with a higher number. Now you can delete the original track, and mix the separated tracks as you like. You can also export them as separate tracks by selecting the tracks you want to export, going to File > Export > Export Multiple, and selecting the format you want to export them in.

For guitar play-along backtracks, you can mute the other instruments track and export the whole project as a single song. This will create a new track with the vocal, the drums and bass tracks, which you can play along with your guitar. What I prefer is to connect my BOSS GT-1 to the computer, set it as input in Audacity, and play along with the separated tracks. This way, I can use the effects of the GT-1 and record my guitar playing along with the separated tracks. This is a great way to practice and record your guitar playing without having to worry about the quality of the original track.
Adding Start Ticks
In many songs, guitars either start solo, or with other instruments. This makes it hard to start with the backtrack as there is almost an undetermined amount of silence before the actual start of the song. This is not a problem with the separated tracks, as you can easily add a start tick to the beginning of the track. But for that, we need to know the BPM of the song. You can find the BPM of the song by searching it on Google, or by using a BPM counter. Audacity, by default does not have a BPM counter, but there are many plugins that can do this, such as the VAMP plugins. You can download the VAMP plugins from the link. This executable installer contains many plugins, but they don't take much space (unlike the AI models), and they can be very useful. So we install all of them under C:\Program Files\Vamp Plugins. Then we restart Audacity, and it should automatically find and compile the new plugins.
Now we open the song, or our stem tracks, select the whole track (unless there are significant time shifts - looking at you, you progressive lovers), and select one of the different tempo analysis tools, but what I usually prefer is "Analyze > BBC > Rhythm: Tempo" with default settings. Depending on the song, this result may deviate quite far from the actual BPM, so you may want to try the intro or different segments of the song, or maybe try different plugins.
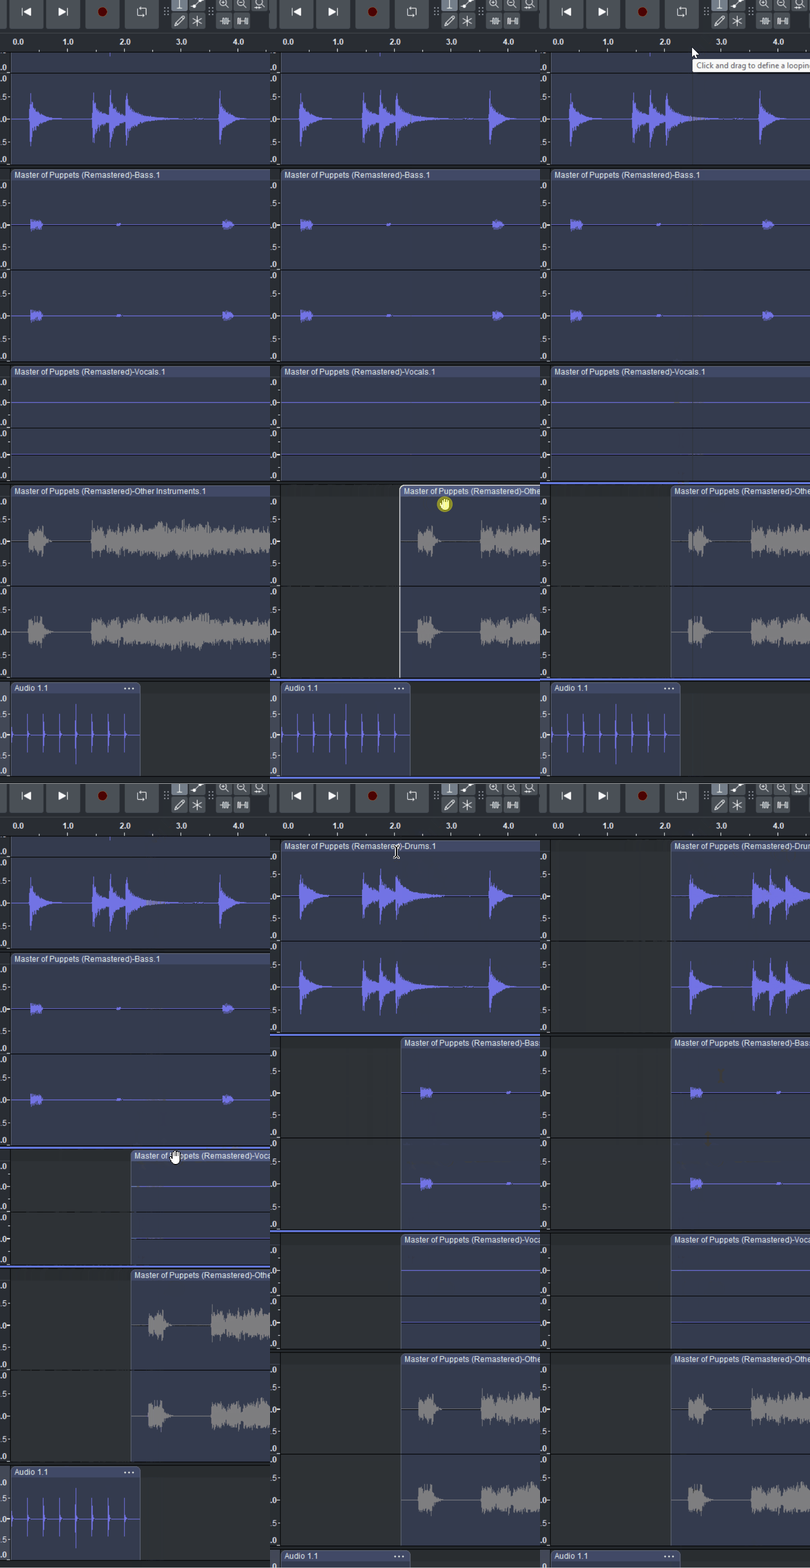
Then we go "Tracks > Add New > Mono Track". This will create a new track at the bottom of the project. Then we go to "Generate > Rhythm Track", and set the parameters. We set the tempo to the BPM we have found, and our preferred beat pattern. I usually prefer the 4/4 pattern, but you can select any pattern you want. You can either put a single bar, or a time duration of your preference. Set the other parameters as you like and click "Generate". This will put a new audio in the new track, yet it might not be aligned to the start. So we select the track by clicking on its name on the left section (Audio 1), then "Tracks > Align Tracks > Start to Zero". Now, most of the time, the song starts after milliseconds of silence, so we need to align the start of the sound with the end of the ryhtm track. You can do this manually by panning the track from its handle (zooming in by CTRL + scroll up really helps here):

Once you align the track with the first sound, you can align the rest of the tracks as they snap to the start of the aligned track, or you can use the "Align Tracks" option again. If you don't like the manual way, you can also either use the align option with "the first beat", or you can use "Trim slience" option to remove the silence at the beginning of the track with the first audio.
Now you can export the project as a single audio file, or you can export the tracks as separate audio files, or you can directly connect the instrument to Audacity for recording while playing along with the separated tracks.